Templates
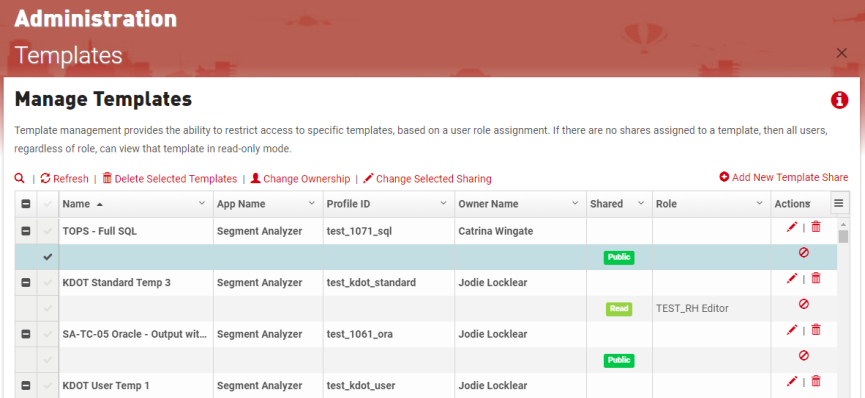
Template management provides the ability for Administrators, with the proper role privileges, to manage access to Segment Analyzer and Road Analyzer templates, based on a user role assignment. If there are no shares assigned to a template it is marked as "Public" and all users, regardless of role, can view that template in read-only mode. Templates can also be deleted and ownership of a template can be changed, even if they have not been shared. Only the users in roles with template shares privileges will be able to manage the share access of any template. See Template Share Privileges below for configuration details.

Usage
The ability to view, save, update and manage template sharing is managed at the user role level by the following role privileges:
Note: The owner of a template will have full access to the template, even if they are not in the shared role(s).
Manage Template Shares at the Template Level:
- Share Templates (ID: 164) - grants the ability to share Road Analyzer templates when saving them, and the ability to update the share access of any templates shared with the user's role
- Share Templates (ID: 214) - grants the ability to share Segment Analyzer templates when saving them, and the ability to update the share access of any templates shared with the user's role
Manage Template Shares from Application Manger at the Admin Level:
- Click the search icon to expand the search field.
- Start typing the name of a template.
- The list will filter to show all matching template(s).
To add a new template share:

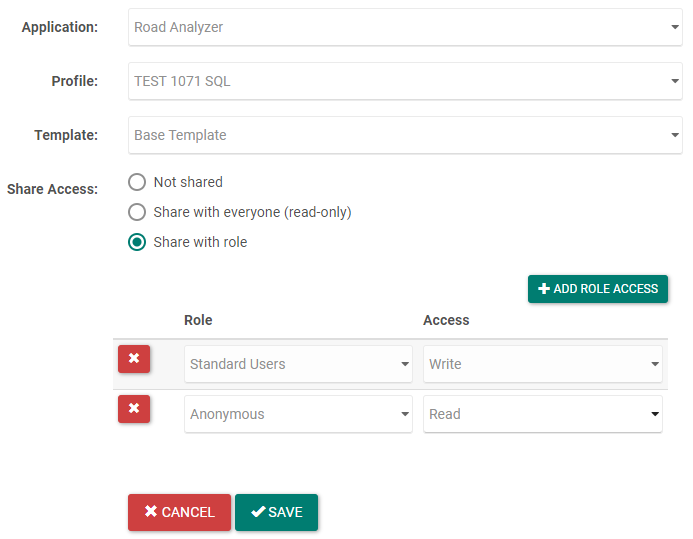
- Click Add New Template Share.
- Select the application you want from the Application dropdown.
- Select the profile that you want from the Profile dropdown.
- Select the template you want to set the share access from the Template dropdown.
- Select the Share Access from the options listed:
- Not Shared - only the owner can use and edit the template within the application
- Share with everyone (read-only) - every user can use the template, but they will not be able to make changes to the template share access or overwrite the template
- Share with role - the Role(s) selected will have the selected access to the template
Note: Any administrators with the Manage All Templates And Shares privilege can manage any template from within App Manager.
 Add Role Access:
- Click Add Role Access.
- Select the role you want to have access to the selected template from the Role dropdown.
Heads Up! Unless Just-in-Time Provisioning is enabled, only built-in roles will be available in the dropdown.
- Select the type of access you want the selected role to have for the selected template from the Access dropdown.
- Read - the users in the selected role can use the template
- Write - the users in the selected role can use and edit the template
- Click Save.
- Click the pencil icon in the Action column of the template you want to edit.
- Make your edit(s).
- Click Save.
- Click the check boxes beside the templates you want to edit the share access of.
- Click Change Selected Sharing at the top of the table.
- Make your edit(s) to the Share Access.
- Click Save.
- Click the trashcan icon to the left of the Name of the template you want to delete.
- Click Delete in the Delete Template popup.
- Click the check boxes beside the templates you want to delete.
- Click Delete Selected Templates at the top of the table.
- Click Delete in the Delete Template popup.
- Click the trashcan icon to the left of the Name of the template you want to remove the template share access.
- Click Remove in the Remove Template popup.
- Click the check boxes beside the templates you want to remove the share access of.
- Click Change Selected Sharing at the top of the table.
- Select Not Shared.
- Click Save.
- Click the check box beside the template you want to change the ownership of.
- Click Change Ownership at the top of the table.
- Select the new Owner from the dropdown.
- Click Save.
- Click the check boxes beside the templates you want to change the ownership of.
- Click Change Ownership at the top of the table.
- Select the new Owner from the dropdown.
- Click Save.